Master Watchmaker, Clockmaker and Jeweller (since 1981)

nick@clockmaker.com.au
Suite 403, Level 4, Culwulla Chambers
67 Castlereagh St. Sydney 2000 NSW Australia
Phone: (02) 9232 0500 Fax: 02 9233 2273


| Chapter 4: Show me the time!
Pulling a watch apart - and even putting it together - is not that difficult at all. What is challenging for many novice horologists is the deeper understanding of how a watch works, Or more precisely why it is constructed the way it is. And without the understanding of that mysterious relation between the flow of the time and a bunch of wheels, spring and hands, all the assembly work is nothing more than just another puzzle. You try a piece which looks right, and if it doesn't fit, well, not a big deal - you'll try another one - until the puzzle is completed. But this is not how a true horologist thinks! Therefore, before we can even consider pulling a watch apart, we should do our best to understand why the watch does what it does! Let's say I show you an hour glass and tell you: this is a device which measures the time.
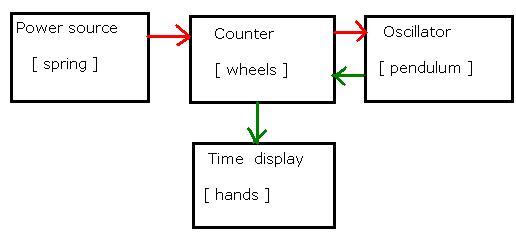
You may say: Well, I can see the glass and the sand - but where is the time? Now, to answer that question, you need a bit of imagination. Suppose that this hour glass clock is the very last clock in the entire universe - and then imagine that the entire universe disappears - except for the clock. When the last grain of sand passes through throat of that hour glass clock, the time itself will disappear! Therefore, time exists because we can measure it's flow between two events. Indeed, to create events by which we mark the flow of time, we can use the flowing grains of sand, or movement of planets and stars, or oscillation of atoms or mechanically generated tick and tocks. Now, let's say that instead of a "clock" filled with sand, we generate events with our long-swinging-pendulum clock. In this case, each uniform swing of the pendulum is an event to mark the quantity of time elapsed. Here is a block diagram of a spring-driven pendulum clock. It is powered by a power source (spring). The power required for the oscillator (pendulum) is transported by the gear work. In return, ticks and tocks ( events generated by the oscillator) are counted and then displayed on the clock dial. The red arrows indicate power, and green, the time generation.
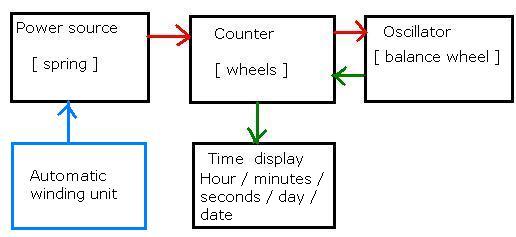
A mechanical wrist watch is really just another variation of a pendulum clock. The main difference is in the type of oscillator. In addition, when the watch is fitted with a "self winding device" we call it an automatic or self-winding watch. Here is the block diagram of an automatic wrist watch capable of displaying time and day/date [Seiko cal . 7S26]:
So my job is not just to tell you where to place each watch part (that is easy!) but also to help you understand the function of each of the units and their interconnection. Due to the size and integration of those units within the watch, the interconnection is unfortunately not always as obvious. Once you get familiar with this concept you will be able to not just assemble the watch but also to troubleshoot and solve any problem! If this chapter does not make sense straight away, don't worry about it too much. It will all be more obvious once we group watch components according to this block diagram. For now, try to memorize as much as you can, accept that time greneration is a fact (even if it may sound illogical) and you will be ready to move to the next step. TO DO: Name the 5 main units of a mechanical automatic watch. 4.2 Finally some goodies! On Friday, I promised some goodies - so here is my very special present: Go to the Time Module website and download the PDF file called Technical guide & parts catalogue Cal. NH25/26 by Time Module, SII. Also, download this file: http://www.timemodule.com/sii/pdf/nh26a.pdf. A bit of a background: "Time Module" is Seiko's 'overseas' subsidiary established in 1987. SII stands for SEIKO Instruments Inc. One of the main reasons why I've decided on 7S26 as our DIY guinea pig is because there is a FANTASTIC technical guide that is freely available online. The NH26 is a calibre code used by TM for 7S26, so it is the same movement. Now if you are an engineer, then you will be impressed with this manual. And if you are not an engineer, and you are NOT impressed, then you should be scared :-) I do have the original Japanese manual for 7S26 but it does not even come close to the detail and clarity of the NH26. We are very lucky that some watch manufacturers are still willing to make technical manuals available to the public. TO DO: print the technical manual (both files). Place the sheets in A4 binder. It would be absolutely foolish to attempt any repair on any piece of equipment without the technical manual. (Technical manual is NOT the same thing as operational manual, and yes, you should read the operational manual too!) To learn how to repair a watch and do a good job is impossible without the technical manual. Therefore this is the most important document for your DIY project. Take good care of it, read it, look at the drawings and diagrams and BE IMPRESSED! Yes, in a few short weeks from now, you'll eat it alive. Now, there are a couple of things you need to do immediately after you print the manual. TO DO: Write on the cover page "SEIKO Cal. 7S26". Also, write down your watch NUMBERS which you've recorded in Chapter 3. On page One, next to Duration time write: POWER RESERVE. TO DO: Give yourself a good tap on the back - you've made a BIG step towards becoming a SERIOUS watch enthusiast. Congratulations! 4.3 "I've got it" I have started receiving your "I've got it" messages. (I am still awaiting delivery of my watch - and that could take another week at least). Also a number of you already had a pre-owned 7S26 watch/movement in collection. Here is an IMPORTANT message: please DO NOT ATTEMPT to open your Seiko watch as yet. It is very tempting to get into it - especially that you now have the technical manual. But such a hasty decision would be very foolish for a number of reasons. PLEASE WAIT ! Here is something you can do right now. Seiko 7S26 cannot be wound manually. More about that in due time. Therefore to power it up, you need to attach the watch to your wrist and wear it for at least 8 hours per day. TO DO: 1. Set the time and wear your watch for 8 hours 2. After 8 hours, set the time again against your most accurate time source (see note below for time source) and write down the time (for example: watch set on Monday, August 15 at 10:00:00 am) 3. From that moment on, wear the watch for at least 8 hours each day over next 7 days. 4. After 1 week, record the time again and find out how much time your watch has lost or gained in seconds. 5. Divide that number by 7 to get the DAILY error in seconds. For example: 70/7=10 sec per day 6. On day 7, take the watch of your wrist ( lets say at 6 o'clock ) and do not wear it anymore. 7. When the watch stops (in 12 hours, 24 hours or 48 hours - whenever that may be) read the time on display. Then calculate the lapse time ( from 6 oclock until it stopped). This is the power reserve, and is measured in hours. Note this down. After this exercise you will know daily error and power reserve of your watch. You have noticed that 7S26 does not have the hack function - when you pull the stem, the watch does not stop! This is another unique feature of this particular calibre but the time can still be set to the second if you know how to do it. It is actually very simple - pull the crown all the way out. By turning the crown backwards, apply just enough force to stop the watch. It is really a very small amount of force; enough to stop the seconds hand but not enough to move the minute hand. With a bit of practice, you'll get to be an expert at this in no time. TO DO: learn how to "hack" 7S26 movement and set the time to the second. Time source: Your best time source is your personal computer. To keep my PC synchronized, I have installed a piece of software called Dimension 4. Once installed, it will work quietly in the background, and your PC time will be almost spot on. Of course there are other ways to synchronise your PC clocks, but if you like the convenience of "setting and forgeting" then this may be the way to go. Are you having fun? I hope you are enjoying the DIY ride. To get the maximum amount of fun out of this DIY project you need to trust my guidance, be patient and be willing to learn. While something I say now may not make sense, it will all come together in the not so distant future. As you have noticed, your technical background is almost irrelevant. I am trying to present this matter in an easy-to-follow manner which would be equally digestible by a professional, technically minded person, a student or someone who comes from a completely different background. Let me know if this is still too difficult! Next chapter: Tool recommendation for DIY repairers |
|
Previous Chapter | Home | Next Chapter
|


